
This How to Make Perfect Artisan Bread recipe has changed my life! That might be sad, but it’s true! I finally have a super easy bread recipe that tastes like it was made by a professional baker. I couldn’t be happier! One day I was in a time crunch and needed bread to go with a meal. I decided to try making a French bread with my favorite pizza dough recipe, and I remembered a tip I had seen for getting a nice crust on the outside so I tried that as well. The result was amazing!
This bread makes wonderful garlic bread, perfect for panini’s and is delicious with soup! It also makes fabulous croutons! I hope you love this recipe as much as I do!
Delicious Roll Recipes
- Mom’s Best Dinner Rolls
- Ninety Minute Rolls
- Lion House Rolls
- One Hour Dinner Rolls
- Lunch Lady Cafeteria Rolls
- Easy Homemade Hard Rolls
step-by-step instructions for How to Make Perfect Artisan Bread
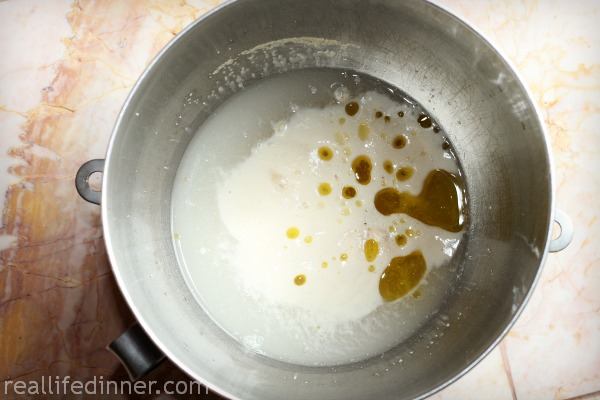
- Add yeast to warm water and allow to sit for 5 minutes.

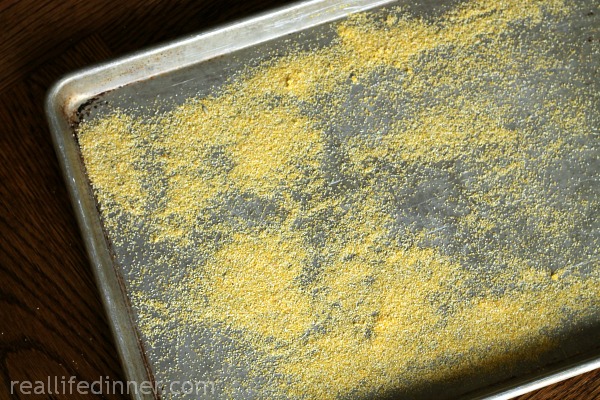
- Sprinkle 2 tbsp of cornmeal onto a large baking sheet and set it aside.
- Add sugar, salt, and olive oil to yeast water mixture.
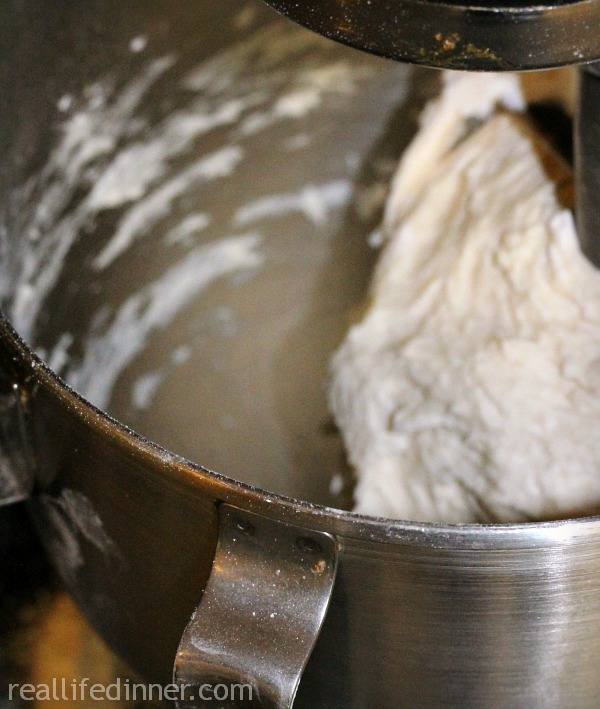
- Add four to five cups of flour. Start with four cups and add more as needed. Mix dough in the stand mixer or knead by hand until dough comes together and no longer sticks to edges of bowl. Once it is not sticking, continue to knead for 3-5 minutes.
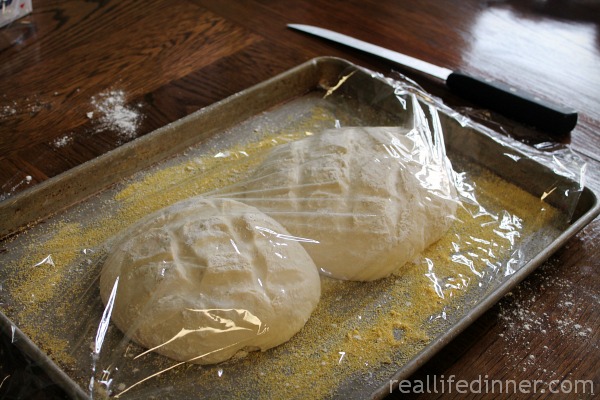
- With floured hands, divide dough into two equal pieces and form each piece into a ball. Place dough balls (4-5 inches apart) onto baking sheet sprinkled with cornmeal. Make sure each dough ball is coated generously with flour.
- Using a serrated knife, make a tic-tac-toe design on the top of each dough ball.

- Cover loosely with plastic wrap and allow to rise for 40-60 minutes or until dough has doubled in size.
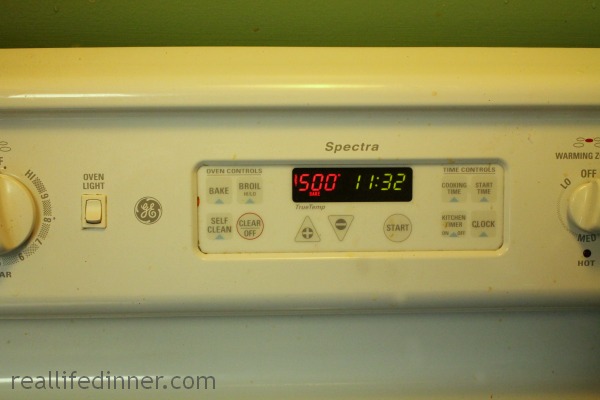
- Preheat oven to 500 degrees.
- Uncover dough that has doubled in size and place on the middle rack in your preheated oven.

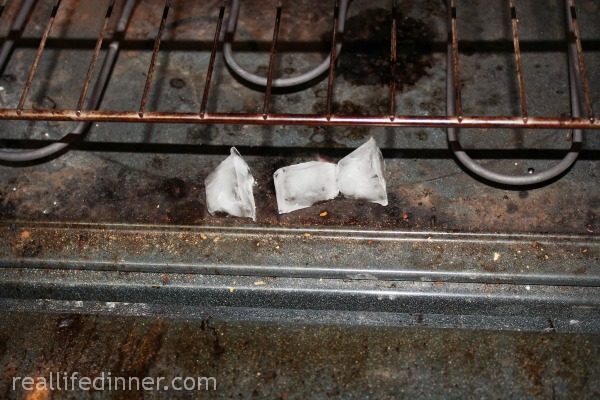
- Throw 3-4 ice cubes in the bottom of the oven and close door. This is the most important step that gives the dough an awesome chewy and slightly crusty outside!
- Bake for 15-20 minutes or until bread is golden brown.
- Remove bread from oven and place bread on a cooling rack to cool.
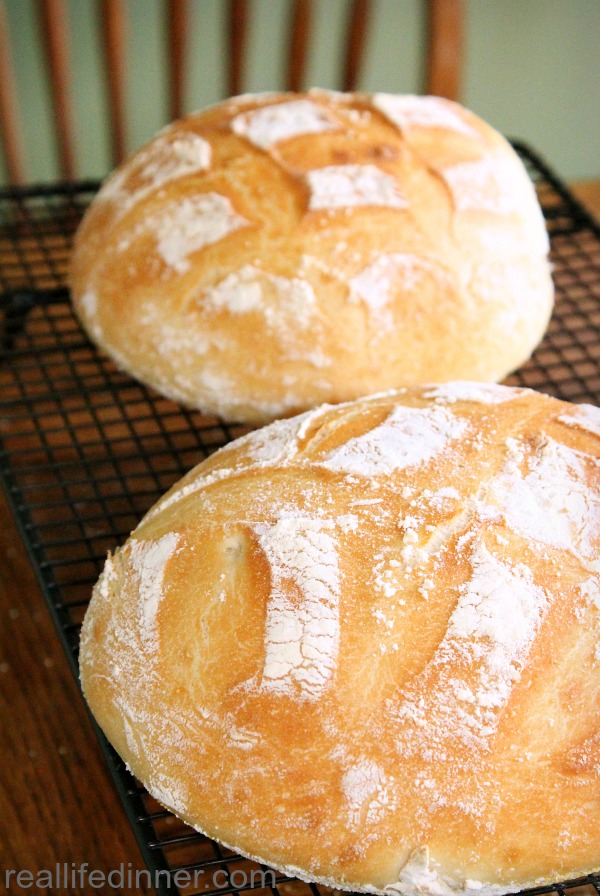
- Bread will slice easier when it is completely cooled.

Tips for making Perfect Artisan Bread
- The warm water should be warm on your wrist, sort of like baby bathwater or a little warmer.
- Coat the loaves with flour before covering them with plastic wrap to let them rise. You can also spray the plastic wrap with cooking spray to prevent the dough from sticking to the plastic wrap.
- This bread freezes great and is so handy to have in the freezer for busy days! I freeze it whole and then slice it after it thaws. It stays fresher that way. It would still freeze well in single slices, but when possible, keep it whole.
- I use 1 1/2 cups of whole wheat flour almost every time I make it for my family. I wouldn’t suggest using more than half whole wheat flour in this recipe. It makes it denser and changes the flavor some.
Make sure to follow Real Life Dinner on Facebook and Pinterest! You don’t want to miss any of these fantastic recipes!
More favorite bread recipes


- 2 cups warm water
- 2 tsp yeast
- 1½ tsp salt
- 2 tsp sugar
- 1 tsp olive oil
- 4-5 cups flour
- 2 tbsp cornmeal
- Add yeast to warm water and allow to sit for 5 minutes.
- Sprinkle 2 tbsp cornmeal onto a large baking sheet.
- Add sugar, salt, and olive oil to yeast-water mixture.
- Add the flour starting with four cups.
- Mix in a stand mixer or knead by hand until dough comes together and no longer sticks to edges of bowl. You will most likely need to add the additional fifth cup of flour.
- Once dough is not sticking to the bowl, continue to knead for 3-5 minutes.
- With floured hands, divide dough into two equal pieces and form each piece into a ball.
- Place dough balls 4-5 inches apart on the baking sheet sprinkled with cornmeal.
- Generously coat each dough ball with flour.
- Using a serrated knife, make a tic-tac-toe design on the top of each ball.
- Cover loosely with plastic wrap and allow to rise for 40-60 minutes or until dough has doubled in size.
- Preheat oven to 500 degrees.
- Uncover dough that has doubled in size and place on middle rack in your preheated oven.
- Throw 3-4 ice cubes in the bottom of the oven and close door. This is the magic step that makes the crust on the bread AMAZING!
- Bake for 15-20 minutes or until bread is golden brown.
- Remove bread from oven and cool on rack.


I made this for dinner tonight along with clam chowder. Everyone loved it!
Awesome! I am so glad! I love to hear when people make a recipe and love it! I bet your soup was delicious!
I just made this. I had trouble with the yeast. I tried three different ones that I had. I have a photo of the final bread, but I dont know if I can post it here. I am right in assuming that the yeast goes into 2 cups of warm water? Eventually I got it to bloom in one cup of water and then added another cup, but it took over half an hour to bloom! The end product looks good, but it should maybe be taller… Thank you!
Depending on the weather or temp of your house it can effect how tall the rise gets. What type of yeast are you using? I saw your pic on Facebook and I think your bread looks great. how did it taste?
Depending on the bowl, I always preheat with hot water. Also make sure your water is warm enough. It should be warmer than baby bottle warm.
What an amazing recipe thank you so much for taking the time to put together🙌🍻
Thank you Miguel!
Can you make this as on large bread rather than two smaller?
Yes! I did and it turned out great. Baked it in a covered Corning ware roaster at 450 for 30 min and an additional 5 min with the lid off. Turned our perfect!
Mine did not rise. Probably because I used fast rise yeast which I later found out does not need to be proofed. Also, Bob’s Red Mill says you should not mix salt into it in the proofing process because it will kill the yeast. So I suggest the salt be added in with the flour, not the yeast and water.
Sorry to hear it didn’t rise! If you use rapid yeast, it doesn’t matter if you put the salt in first.
Can you make this in a Dutch oven?
Yes, I have heard of people having great success using a dutch oven pan, although I have never tried it myself.
Made this bread for the first time, and my girls absolutely loved it! They’ve been begging me ever since to make it again. They said it’s just like restaurant bread. Thank you for such a quick and easy recipe.
Awesome! I love hearing that Laura!
I have made this bread twice. Turned out perfect each time. Today I’m making into bread bowls (8) for soup season. I hope it turns out.
Yum, that is a great idea! Let me know how it goes.
I LOVE this recipe…. It’s the only one I use now. I make it to the dough stage in my bread machine, adding in the order of bread machine instructions. Leave it covered to rise for an hour and go from there….. DELISH!!!!!!!!
I am so happy to hear that! I love it too, the bread machine is a great idea!
Hi Maria,
Came across your website last night and decided to try baking this bread this morning since my boys decided to wake me up at 5:45am this morning. I love how easy it is but I did run into some problems.
1) my bread came out to heavy and dense. What did I do wrong? I used about 4 & 1/4 cups of flour when it was kneading in the KitchenAid but I thought the dough was sticky so I put it onto the counter with some flour and added a handful of flour and kneaded it some more until it was smooth. Did I add to much flour? Or over knead the dough?
2) After 50 mins in the oven the bread felt and tasted very dense and my MIL said the middle was like slightly under cooked maybe. Could the under cooked feel be due to the bread being too heavy and dense? I did find some large pockets of holes here and there but other than that it was compact dense!! But tasted wonderful!!
Please help!!
Kindest regards
Frankie
p.s. my boys still loved the taste of it!!
Hi Frankie,
Well this is very interesting. It does not sound like you added too much flour and I occasionally knead my dough on the counter as well, so that should not have been the problem.
What kind of yeast did you use? Was your water too hot or not warm enough? Did the dough rise normally? What temp did you cook it on? After 50 minutes in the oven at 500 degrees it should have been a charred brick. The answers to these questions might help me better pin point where things could have gone wrong. I am glad you tried the recipe and I want to help you get perfect results next time. 🙂
Maria
I think I didn’t let it rise enough. I let it rise for 60mins but just realized it did NOT double in size. I think my house is a bit on the cooler side so it may take longer to rise. As for the yeast, I use Fleishmann’s Active Yeast. Oh typo on the baking time. It should have read “22 mins”. Don’t know how I typed 50mins.
Not giving up!! Going to try again tomorrow. But in the mean time my family loved it! My husband and 3 boys slathered peanut butter on it and started gobbling. My husband cant wait until I try again.
It sounds like it probably was the rising issue. When my house is extra cold, I warm my oven up to 195 and then turn it off and place the dough (in a glass bowl) covered in there from 20-30 minutes or until it is doubled. It sounds like you are well on your way to becoming a Pro! Let me know how it goes tomorrow! 🙂
If you put your oven light on, put dough in oven, it seems to be the perfect temp for yeast to rise. I use this method all the time.
Awesome! Great tip!
Check the expiration on your yeast packets/bottle. One of the stores nearby is notorious for selling expired yeast packets. Since it is the closest store I dig through to the back to find the stuff that hadn’t expired.
On another note, I am making this now but going to add cheese and herbs. Can’t wait!
Tried this recipe and the bread was delicious! It was easy and didn’t take forever. Thanks for the recipe!
Awesome! So glad you liked it. It is definitely my go to!
My plastic wrap stuck to my bread 😶 and cause it to loose air after rising. Such a bummer…. I suggest you spray your plastic wrap before putting on bread to rise.
I’m sorry to hear that. Yes, spraying your plastic wrap with cooking spray helps. Another option is to coat the loaf with extra flour before covering it. I hope your bread wasn’t a total loss.
I made this the other day and it was excellent (even though I forgot the ice cubes until it was halfway done baking)! Do you have any advice/experience with “additions” to the bread? I was thinking about putting in some fresh rosemary next time…
Hi Emily, I am glad you liked the recipe. I have actually never used add ins, but I have been dying to try adding some rosemary or roasted garlic sometime soon. I think both of those would work out as well as taste wonderful! a small amount of any type of dried herb incorporated into the dough would probably be fantastic….now you’ve got me thinking.
When you freeze it do you slice it first or wait until it thaws? Do you wrap it in freezer paper first? Never frozen bread before so I want to make sure I am doing it right.
Thanks!
Hi Kellie, That is a great question. I freeze it whole and then slice it after it thaws. It stays more fresh that way. It would still freeze well in single slices but when possible I like to keep it whole.
Maria
Looks great! Is rapid rise yeast ok to use with this recipe? I was planning on using garlic and my basil-infused olive oil to make it extra yummy!
Yum, That sounds so good. Rapid Rise yeast should be fine, just watch it and make sure you don’t let it more then double it’s size while it is raising. 🙂
Absolutely delicious!! With the rapid rise yeast, about 45 minutes was good for rising. The garlic and basil made it have an amazing flavor! For the first time making bread, I am thoroughly impressed! This will be my go-to bread recipe! Thanks for sharing!!
Yum! That sounds awesome, and this is the best recipe for first time bread making….I am actually making a batch right now. Wish I had some basil to through in. Did you use fresh or dried?
I actually had a bottle of basil infused olive oil, but then I also added a little dried in too
YUM!
Hi Maria,
Are the measurements for the Rapid Rise yeast the same?
I can’t wait to try this!!! I will keep you posted. Thank you!
I haven’t ever used rapid rise, but I am pretty sure you do not need to adapt the amount. Let me know how it turns out.
this is really useful information but I want to know cup sizes. What’s the cup measurement? Because it only says 2 cups.
Last night I failed to bake a good bread with wrong measurements.
It would be nice if there is exact measurement.
Hi Kate, Whenever I refer to a cup of something I am referring to the standard 8 oz cup.
I see. I’ll try tomorrow night. I just used small cup I have but poor taste.
Thank you
Good luck!
Is it possible to use whole wheat flour?
Thanks!
Hi Hank,
I have never tried 100% whole wheat four in this recipe but I use 1 1/2 cups of wheat almost every time I make it for my family.
I wouldn’t suggest using more then 1/2 whole wheat flour in this recipe.
Maria
Finally i found THE RECIPE .no words …… thank you soooo much.love from Greece.
YEAH! I am so glad you like the recipe. You are so welcome! I love it that you are in Greece!!!
Not only liked i am thrilled.Delicious bread ,and ice cubes in the oven? never thought of that.I made a bunch today ….. all gone, even from non bread lovers……tomorrow i make them again and then its …. pizzaaaaaa time.And we all know witch recipe i will make. Cant wait. Again a big thank you.
🙂 I am so glad it was a hit! We love it too! I make it at least once a week or so! Pizza sounds good, I think you just convinced me that we need to have it for dinner tomorrow! 🙂
Hey Maria,
I just came across your website and i was wondering why do you pout the ice cubes? Also how many loafs does this make? Im dying to try this with butter and jam, oh and Nutella. hmmmmmm yumm. Thank you so much! From Dubai,UAE!
Hi Zeena, The ice cubes help give the bread a crustier crust. 🙂 It makes two loaves. I am glad you found my blog.
Dear Maria….I have been making bread for over 45 years, and I have to admit it may be only a few times a year because it’s always a “project” ….an all day affair.. Mix it, raise it, punch it down, raise it again, punch down and make it into loaves and raise it again! Today I was looking for a quick bread online and stumbled on your website. I have to tell you, this was VERY easy, and my husband loved it! When you consider that bread is $3.99 per loaf in the stores, one would have to be crazy not to make this at least once a week! I really could have started this project an hour before dinner and it would be piping hot with our meal! Can’t wait to further explore your website for more ideas. Sincerely, Diana
Diana! Thank you so much for finding me and trying out this bread. I feel the same way…you would have to be crazy not to make this once a week! It is so easy and yummy! I appreciate you taking time to leave me a comment! If it is practical and Yummy it’s always going to be a win in my book. I hope you find more recipes you love on my site. Maria
Can the recipe be halved?
Hi Jeri,
Yes, it can. Another option is to make the whole batch and freeze one of the loaves to enjoy later.
Maria tried your recipe for the bread was soon easy and tasted fantastic. I added 2 cups of asiago cheese shredded to the mix love that taste,thank you for a great bread.
Yum! I bet it was delicious with the added cheese! SO glad you liked it!
Now let me get this straight you only allow the dough to raise once? this actually sounds like my regular bread recipe except I used shortening and allow my dough to raise twice so is the use of olive oil and the once raised dough the difference in what makes it Artisan? Huh interesting. Let me know I am very interested in this once raise dough method it would sure make it go quicker:)
Hi Evone,
Letting the dough only rise once and the very small amount of fat “olive oil” along with the cooking method, high temp with steam from the ice cubes, is what gives it the more artisan texture then regular bread. It makes wonderful bread for dipping in soup, making panini’s, eating with Italian food and I also love to make it into Garlic Bread.
Maria
Just made this wonderful recipe. ♥♥♥♥ thank you so much. This has been my first attempt at making any type of bread and am super psyched to try different ideas in the future.
YEAH! It makes me so happy to hear from people who love this recipe as much as me. It is so easy and the perfect go to bread! Thanks for taking time to come back and let me know you tried it!
Hi Maria
I’m loving the feedback that you’re getting on your artisan bread. I am experimenting with bread for the first time, so I pray that I get it right the first time. My husband loves bread and eats LOTS of it, so I wanted to surprise him by making fresh homemade bread. My first question is do you use all-purpose or self-rising flour and my second question is how warm should my water be when dissolving the yeast? Thank you so much in advance 🙂
Hi Ann,
I am excited to hear you are experimenting with bread. Once you start and get comfortable with it, you will never stop making your own. This is the perfect recipe to start with. The water should be warm on your wrist, sort of like baby bath water or a titch warmer. I use regular all-purpose flour, and occasionally use a cup or so of whole wheat flour….but I like the taste of the the all white bread a little better. 🙂 Good luck!
It says in the directions to make sure each dough ball is completely covered in flour,flour or corn meal,because I see it says to flour your hands and spread corn meal on baking sheet
My dough is rising..can’t wait to have this with dinner tonite! Found you through Pinterest! Can’t wait to check out the rest of your site!
Awesome! I am so glad you found me! You’re going to love this bread. It is so easy and yummy!
Thank you for this simple, amazing recipe! The ice cube trick is genius, no more $4 loaves of bread in this house anymore!
You are so welcome! I love it too and hallelujah to the “No more $4.00 loaves of bread!”
Thank you so much for a simple bread recipe that is quick too. I find it just a little dense but my husband likes it. How do I use it for pizza dough? And can you punch this down after it rises and kneed it again to make it less dense?
Hi Lisa,
Glad you like the recipe. Letting it rise twice may make it less dense, I have never done that myself with this recipe, but it should and would be worth a try if you want a slightly fluffier bread. For pizza dough you can do one of two things, you can make it, form it in to two balls and let each of them raise (covered) for 30-60 minutes before rolling it out and making it into a pizza. Or you can make it in advance form the two balls, put them in large plastic bags in the fridge and them use them 8-10 hours or even the next day. I used to work at a pizza place and we would let the dough set overnight in the fridge. Good luck!
Maria
This came out beautifully! Great recipe!
I’m replying to myself! After having great success making the artisan bread loaves, I used this same recipe to make swirled herb bread and swirled apple cinnamon bread.
Ooh, Apple Cinnamon Bread, what a great idea, that sounds delicious! I’m so glad you like the recipe and you’re having fun with it.
Crust was good but the bread was very heavy – didn’t double in size but only saw after I had made it that the yeast I bought said mix in with the flour not with water so maybe that was the problem.
Have you tried it again? The bread is meant to be a little heavier, not like french bread.
Hi Maria,
Tried the recipe this morning and was very enjoyable.
Though when slicing through, the bread stayed depressed and didn’t spring back much. Perhaps this is the one-rise method, or did I do something wrong?
I did forget to add the olive oil once I’d shaped my two loathes so put them back in the mixer with the olive oil and kneaded again for a couple of minutes.
Thanks.
I didn’t mean to rate it one star!
Hi, i am totally psyched that is found this recipe this morning. 6am with nothing to do and no bread in the house, then I came upon this recipe. I found other recipes that take over 3 hours but I was looking for something quick to feed my younger sister before she left for school today. Bread is rising now, I can’t wait to finish it!!
Btw, I ran out of all-purpose flour, and ended up using the last cup with whole wheat flour. Would this affect the bread much?
Hi, so I tried this recipe, and messed up badly.
The bread that came out of the oven did not brown evenly, and was overall white. Cutting into it, more than half of the bread was uncooked. I left it in the oven at 500F for almost 25 minutes.
I don’t think the dough rised properly, but it looked the same as your dough in the photo.
Maybe it was my yeast? I used bread machine yeast, but it works fine for other recipes. Though there weren’t any bubbles or anything like yeast usually looks like after active.
I’m going to buy some new yeast today, and try this recipe again (it looks so good, and I desperately want to get this right) so hopefully I can do better.
Hi maria.. first at all thanks for sharing your knowledge.. It seems yummy and easy to make.. I am so ready for trying it tonight !!!!!!!!Just one question if I want to add some grains and/or nuts when it is the appropiate time to add them? Thanks
I have never tried adding grains or nuts, but I would assume you should add them at the very end as you are finishing up the kneading. Good Luck!
Thank you for such a great recipe! I started the dough in my bread machine. I think I will try my kItchen aid next time.
This was super easy and delicious. I started the ingredients in my bread machine but I think next time I will try mixing the dough in my Kitchen Aid. I think it might be easier to control the consistency of the dough that way. Nonetheless, the bread was crunchy outside and wonderfully springy on the inside. Definitely my favorite bread recipe so far.
Awesome! I am so glad you liked it. Thanks for coming back to let me know.
Hi. Your recipe and bread look really good . May I ask if I can substitute by equal proportion the white flour to wholemeal flour without compromising the outcome ?
I try not to add more than 1/2 whole wheat flour. It makes it more dense and changes the flavor some.
Hi maria!
So I’ve been looking for a good artisan bread recipe that wouldn’t take forever to make. When I found your recipe I immediately tried it and IT WAS AMAZING!!!thank you so much for the recipe!!!
I have been making all my own bread for a couple of years now. I find that using a starter sponge makes for much nicer bread. A better crumb texture. It takes no time to mix yeast and water the night before. This then bubbles up overnight and starts to develop flavour! Quick bread lacks flavour. The next evening I use the starter sponge together with the bulk of the flour plus salt, olive oil and water to make the dough. I get a good rise on the bread and fab bouncy texture (not the rather cake-like close texture of some homemade loaves). Once you’ve tried it there is no going back! Paul Hollywood is a good source for bread making advice.
Sorry missed out the flour in the starter sponge – yeast water and flour!
Awesome! I will have to try that. Thanks for the tip!
Maria, thanks for this recipe. I’m on a bread-making kick and enjoy the no-knead stuff…but not the fact that I need to plan for it the day before. Just took my loaves out of the oven and I’m delighted (as is my family). My new go-to recipe, for sure! As a full time working mom of three (plus a hungry husband), I appreciate being able to put homemade on the table without hours and hours of prep. 🙂
I have been trying for ages and a lot of different different recipes with no success until now. Just made some of your bread its perfect thank you, I need look no more. My only problem is the cling film sticks to the dough when it rises, any ideas.
I am so glad you found this recipe! I love it too….has totally made my life complete. 🙂 As far as the cling film sticking, try sprinkling top with a lot of flour or you can try spraying the film with a cooking spray or you could also try using a thin dish towel instead of cling film. I usually just put lots of flour. Good luck.
First time ever baking bread. I love bread. I followed all instructions as best I could but instead of yeast I used Clabber Girl “double acting” baking powder”. After mixing everything it seemed the dough was very sticky. So I just kept adding more and more flour until it would stick anymore. After I cooked it the outer crust was very hard. Could you give me some advice concerning the stickiness of the dough?
and the hard crust? I did put a bit too much olive oil also.
I love baking bread and am anxious to try this recipe. Have you ever made it with bread flour?
I haven’t ever used bread flour, but I am sure it would only make it more delicious! 🙂
Made several times with a twist! Today, lemon pepper, garlic butter onion, orange marmalade, and 2 reg. Just add a little more flour and you have a whole lotta new kind to try. Honest none have come bad
Awesome! Thanks for letting me know. My kids would love the garlic butter one.
Loved the recipe but… tried the ice trick and it leaked down intomy oven drawer and onto the floor, next time I might justput a little mtal bowl with water in the bottom!
Bummer about the ice. A little metal bowl is a great idea and should work really well. Glad you like the bread!
Can I ditch the cornmeal?
Yes, but it helps the bread not stick to the pan, so make sure to grease pan well before placing dough on it to rise.
Can I use flour or parchment paper?
I have never tried parchment paper but it will probably work. Sprinkling it with flour will help ensure the bread will be less likely to stick.
how big are the breads?
about the circumference of a pie tin.
Hi Maria I just made this – I used parchment paper it turned out really well!!!!!!
great and simple recipe I love it!!!!!!! (-:
hi ‘ i’m peivand from iran . it was 1 week that ive been searching for a good artisan bread recipe
your recipe is really great . i just made it and loved it . thank you
So glad to you like it!
DELicIoUs!! Just made it and one loaf is GONE!! So easy!! Thanks!!!
The combination of easy and delicious is always the best! So glad you like it!
Getting from Down Under! Made this artisan bread today and it was amazing. So, so good that both have gone. Definitely making this again tomorrow and freezing one.
Hello,
I was looking for artisan bread recipes in Google and I found your recipe really interesting and I would like to try it.
I have a question though, is it a must to use corn meal? Coz I can’t find it in the grocery where I live. Also, is there a specific type of flour that I should use? Is it good to use bread flour in this recipe?
Corn meal is not necessary but it helps keep the dough from sticking to the pan. You can use parchment or heavily grease the baking sheet.
Hi there,
This was my was 6th recipe I’ve tried and by far one of the best…I even added rosemary & garlic. Half all purpose half wheat flour and it came out beautifully. Thank you very much for sharing your knowledge!!
Hi,
Maybe a stupid question but should I use all purpose flour or bread flour? I tried it with all purpose and the bread didn’t double in size. It also remained incredibly dense.
Hi Arthur,
You can try bread flour if you would like. I have never used bread flour but I am sure it would work well. As far as the dough not doubling, it could be a number of factors, age of yeast, water temp (too hot or too cold) or it may have just needed a little more time to rise. Good luck!
Maria
Just made my first loaf. In the oven baking now in a Corning ware covered roaster which I heated in the oven while the oven preheated to 450. Made one large loaf and used parchment paper. Set the timer for 30 min as it is one large loaf. Will let you know how it turns out.
I made this last night. AWESOME!!! It was easy to do. This says a lot because I use a bread machine all the time, but this recipe was so simple. Just to add, I do use bread flour because the bread doesn’t come out as dense, at least with the bread machine it makes a difference. Also, for those trying the recipe, if you have a convection oven, don’t put it at 500 degrees Fahrenheit, because after 10-12 minutes my bread almost burnt to a crisp. I pulled it out in time but the crust is very dark. The second loaf I put the oven at 400, and about 18 minutes it was beautifully colored and done!!!! 🙂 Other than that it’s perfect!!! My kids loved the taste and my husband said even the somewhat over cooked one tasted good!! Next time I will try with some wheat flour! (1/2 wheat 1/2 white)
Thank you for sharing and I look forward to more!
Wish I had read through the comments before baking my bread. I used the cornmeal and set my oven at 500 and about the last ten or fifteen minutes my oven and house was covered in smoke and I yanked the pan out and took outside and placed on another pan after getting most of the smoke out of my kitchen and placed back in the oven minus cornmeal
Hi Marcelle,
I am sorry you had a smoked out Kitchen, It sounds like parchment will be a better option for you instead of cornmeal. It is so interesting how different stoves do different things. I have never had a problem with using cornmeal. I hope your bread was still tasty.
Maria
Hi Maria, yep think you are right about using the parchment paper next time.
Have made this bread several times now and great results every time. I like making 4 smaller loaves and using them as bread bowls.
Hi Maria,
Thank you for the efforts you spent in sharing your recipe. After reading your instructions i couldn’t wait for next morning to make your bread……sorry to say it was a disaster and i need your help to correct what i did wrong because i love artisan bread. So i followed everything ALMOST exactly except for the oil, i used 2 tsp. The loaves expanded but not so much in height but rather in radius. They were not as high as i see in your pictures but were quite wide. Once i pull them out of the oven, the cuts i made with the knife flattened and you could barely see there were cuts on top. Bottom of the bread burned even though i baked them in the middle rack. I have a convection oven and 500 degrees may have been too high. The only thing that came out right was the crispiness of the bread. I think i didn’t knead it enough time (how long should it be?) and is your dough pretty moist when you shape it? mine was very moist and somewhat sticky and i had to flour my hands a few times….i also let it rise for about 1 1/2 hour as i was busy doing other things… I also wanted to know if your bread had big holes in it? mine had tiny holes like a sponge……please help me correct the problem, i like to give it another try…..Thanks again.
Hi Ilana,
So sorry you had bad results, but I think I know what happened. It sounds like you needed to add more flour. It should not be so sticky when you are forming it into balls, and kneading some extra flour into it will help that. Also, with a convection oven I would lower the temp to 450 degrees. And letting it rise to long can cause it to get to wide instead of high (the overly sticky dough contributes to that as well.)
How deep did you make the cuts? I only go about 1/4 inch down into the dough. Good luck next time. Sounds like there were just a few kinks and once you get them worked out you will be a bread making pro!
Maria
thank you for your quick response……i will use these extra tips and hope for more success next time!!
all the best!
Dear Maria,
I’m writing this comment after having eaten a slice of the wonderful artisan bread which I made for the first time today. Thanks for sharing this recipe. The bread turned out perfect! I followed the instructions step by step and the results were great. I’m pretty new to bread baking… this is only my third loaf. After this attempt, I’m encouraged to continue. Thanks!
Greetings from Switzerland!
Hello from America 🙂
Thanks so much for taking time to let me know you made the bread and enjoyed it! I am so glad! Take care and here’s to more bread making in your future!
Maria
Is this recipe able to be reduced at all. 4 – 5 cups of flours is a little much for a 3 person household.
Yes, you can half the recipe and make 1 loaf instead of two. Or you can just make the whole thing and freeze the extra bread for future meals. The bread freezes really well.
This was a total hit in our house! I used a basil infused olive oil and it kicked it up a notch. My only problem that i’m facing is that the bread comes out a tiny bit doughy. Is that the consistency that it’s supposed to be or is it supposed to be light like french bread? Also have you ever rolled them out in baguette form?
Thank you,
Rafaela
If it is a little doughy, you may need to let it rise a bit more. I have not done baguette, but I have done rolls the length and size of hot-dog buns.
I hate baking and cooking but I’m trying to be better about budgeting and make more things at home. My first ever bread baking experience, I used your recipe because it was easy. It just came out of the over and I LOVE it! I actually like a dense bread. I have a chicken in the crock pot and can’t wait to dip it in the juices. Thank you so much for posting this because this is a recipe I would definitely continue to use thanks to its ease of use 🙂
Tried this today and loved it! Was a bit skeptical at first, but it was delicious. I will be making this often. Going to try to save a loaf so we can have some with the potato soup I’m planning on making for tomorrow’s dinner.
Thanks!
TIPS: I’ve been making all kinds of bread 2-3 times a week most of my life. Some recurring problems from the commenters:
– TEMPERATURES
– Ambient temperature, drafts, and humidity are important. If you’re able to turn on your oven light in an electric stove, or new gas stove with a striker and no pilot light, leave the light on if it will stay on with the door closed. It creates a perfect temperature for rising. If you use an older model gas oven, you can simply use the heat from the pilot light. You can also add a quart container that’s full of boiling water that will fit in your oven with your baking sheet. CHECK this BEFORE you make your bread. The quart container measurement does not have to be exact, it just should be close in size.
– Check your OVEN TEMPERATURE before mixing your bread by using a separate oven thermometer, NOT a refrigerator thermometer, its scale does not go high enough. Do not rely on the dial on your stove. Oven temperature can vary for many reasons. These can be re-calibrated by either the gas company or electric company. Call them to find out if they provide this service. If not, call your stove’s manufacturer and ask for directions, or read your operator’s manual. Failing all of this, simply add or subtract the difference on the separate oven thermometer with the reading on the stove dial. These differences can be more than 100 degrees, and will definitely determine success or failure when baking. You can also check the temperature in a convection oven. STOVE DIALS MAY NOT BE ACCURATE!!
– PARCHMENT PAPER: read the box to check for maximum temperature. Most parchment papers should not be used above 420 degrees Fahrenheit. It pays to check this out BEFORE you have an oven fire.
– GREASING THE BAKING SHEET: use solid shortening (remember that solid shortening is HYDROGENATED and not recommended, NOT oil or butter. Depending on the oil, it can burn at this 500 degree F. temperature. READ the container for maximum temperature recommended and/or Wikipedia or the FoodNetwork. Avocado oil is the only oil with a 500 degree smoke point.
– CORNMEAL: should not usually burn in a 500 degree oven, IF you use the middle shelf for baking. They use cornmeal in 750 degree F. pizza ovens.
– ADDED INGREDIENTS:
– TOMATOES, whether fresh or canned, remove seeds and interiors, cut into preferred size, drain well and sprinkle with flour to help absorb excess moisture. Plum or Italian tomatoes are preferred, though other tomatoes can be used if you keep mindful of their moisture content. If mixing with other spies, you may wish to use tomato paste.
– OLIVES, drain well, pressing out as much excess moisture as possible, sprinkle with flour to help absorb excess moisture.
– NUTS AND SEEDS, CARAWAY SEEDS, SESAME SEEDS, PEPITAS, SUNFLOWER and others, do not have excess moisture and can be used in their natural state. Some nuts taste better if pre-roasted (spread on baking sheet and baked at 350 degree F. oven for 10-12 minutes, stirred half way through), such as pecans or hazelnuts (filberts).
– RAISINS, DRIED APRICOTS, DRIED CURRANTS, DRIED FIGS, FRESH OR CANNED MANDARIN ORANGES, FRESH LEMONS, FRESH ORANGES, STRAWBERRIES, SHREDDED ZUCCHINI, PEPPERS, ONIONS, GARLIC, OLIVES, PIMIENTOS, GRAPES, BLACKBERRIES, RASPBERRIES, and other similar items. Since they tend to stick together, separate and dust with flour or powdered sugar as appropriate. Chop them as appropriate and drain well, if needed.
– CHEESES: harder cheeses, such as cheddar, Gruyère, provolone, Parmesan, Romano, Jarlsberg, Port Salut and others work well. Just keep in mind the properties of the cheese you want to use, such as Brie or Camembert.
– POTATO FLAKES: you can use these to replace part of the flour, or to use if the dough is too sticky as you would extra flour. They provide great flavor and also help the bread stay fresh longer.
– HONEY: if you use honey to replace the 2 teaspoons of sugar, it helps the bread stay fresh longer, not that that’s ever a problem!
– HERBS: if they’re fresh, clean and pat dry, they can be used as is. If they’re dry, you may want to put them in a tea strainer and run under running water to help rehydrate them somewhat.
– SPICES: pepper, ground fennel, ground cinnamon, ground mace, ground allspice, ground cloves poppy seeds and others can be mixed or used separately as desired.
– SALT: besides being used in the dough, you can sprinkle coarse salts, such as Kosher, pretzel or other coarse salts on the top, not a lot, just enough to give the crust a little more flavor. Using seeds for the crust is not recommended at this 500 degree temperature because they will burn.
I hope you find these tips helpful.
Thanks Suzanne!
Something worth mentioning: DO NOT THROUGH ICE CUBES IN THE BOTTOM OF YOUR ELECTRIC OVEN. You could short the whole thing out and start a fire. Plus some companies void your warranty if you do stuff like that. I put a cast iron pan on the bottom while preheating, and stick and handful of ice cubes in when I put the bread in.
That is a good idea Delaney, Thanks for the heads up.
Has anyone tried baking this in a Dutch oven? Love the Dutch oven bread recipes but don’t like waiting 18-24 hours to rise.
Just stumbled across this recipe and I’m so glad I did. I live that it’s so quick and easy.
My first batch I forgot the salt so it didn’t rise quite right, but it was still very good even though it was kind of flat. I find 500℉ a bit too high for my oven because it runs a little hot. Thank you so much for this recipe. It is my new standard.
I am so glad you like it. I have forgotten the salt before too, 🙂
Made this today and it was delicious! I didn’t have any bread flour so I was looking for a bread recipe that could use ap flour. It turned out great! Thanks for a great recipe.
You are welcome! I am so glad you liked it Rhonda!
Hi Maria,
If I were to choose the knead by hand option, would it be best to do this on a flat surface (IE. counter top) OR just keep it all within the mixing bowl to mix/knead it? I’m still a bit new to baking bread, so just wanted clarification on that. The last recipe I made had me mix all of the ingredients in a bowl, then transfer it to a flat surface to knead for 8-10 mins. Your directions appear to be saying that I simply mix it all within the bowl. Maybe traditional “kneading” is not even necessary for this recipe? Please clarify for this bread rookie & thanks!
K.
Hi Keith,
I usually just hand knead it in the bowl for a minute or two. I prefer that way because I am lazy and don’t want one more area to clean up on the counter. 🙂
Good luck!
Maria
Hi Maria
First try – It is very delicious but flatter than your pictures. The flavour is good, the texture is good, the crust is nice and chewy.
I followed the ingredients list exactly. I was able to use my bread machine for the full mixing. I didn’t need to mix by hand. I let it mix for 10 min instead of 5. (Could this be the issue?) It put in the 4 cups of flour, let it mix, then added the additional cup. I used the “fill and level” method to fill my cup measure with flour each time. (e.g. I did not scoop up 1 cup of flour with the 1 cup measure, but instead used another cup to scoop, then filled the 1 cup measure from that, then levelled it off with a knife). The dough seemed like it either had too much liquid or not enough flour because when I set the 2 loaves to rise, they really flattened out. I baked the loaves for 15 min at 500.
Next time I will try a bit less water. What do you think?
It sounds like you needed to add a little more flour. Depending on weather, or elevation, flour often needs adjusted in bread recipes. You want the dough to be nice and spriny–not sticky, sometimes you may need to add up to a cup more, bread making is an art and the more you do it the more you will start to predict what the dough needs. Hope that helps.
Tried again with more flour. Much better. Thanks!
Great, glad to hear it!
Instead of doing this free-form on a pan and throwing ice cubes in, try using a dutch oven.
A four qt gives it great rise; a 5 qt spreads out a bit more and rise isn’t quite as high (but still very acceptable). No bigger than a 5/no smaller than a 4qt.
1) put the dutch oven and it’s lid in the oven when you turn the stove on to 475o
2) let the oven continuing heating 25-30 min AFTER it tells you it’s ready to go (probably close to an hour in total heating up time).
3)put your dough on a sheet of parchment paper and plop the dough/paper into the dutch oven (gently).
4)NO ICE CUBES (ie no water is needed; the bread will generate it’s own steam)
5)put the lid on, put the dutch oven in the oven and bake for 30 min
6)remove the lid and continue baking for another 10-15 min (check after 10 min)
7)the crust will develop a real dark texture (don’t worry, it’s NOT burnt). It’s the natural sugars carmelizing. Take it out after the extra 10 min or leave it an extra 5. It’s NOT burnt. Trust me.
8)After the 40-45 min total time, take the dutch oven out and gently tip out the bread/paper. The paper is easily removed.
Listen to it “sing” as it cools on a rack. Let it all cool for AT LEAST 90 minutes. The reason for this is its still cooking inside. Cut into it before it’s 100% cool and you’ll end up with it being gummy inside.
Now, that’s some bread you’ll have there.
Maria, I will understand if you want to delete my dutch oven suggestion. I use the Ken Forkish no knead method that uses a 12-14 hr rise with < 1/8 tsp yeast so the times I suggested might not work well with your recipe. Just trying to offer an alternative 🙂
I just found your website today via pinterest and have already made a few of your recipes (oatmeal cookies, zucchini bread and this bread). They all turned out delicious, but this bread in particular is amazing! It’s the easiest and tastiest bread I’ve ever made!
Yay! So glad you found my site, and I am super happy you love the recipes.
Hi, I was just wondering but is it necessary to add ice cubes to make the bread crusty, or will it still be crusty without it.
Thank You 😀
Yes, Ice cubes are necessary. 🙂
Hey Maria,
I would love to try your recipe, but I have a question concerning the yeast: Do you use fresh yeast, sold as cubes in the cool diary section of the supermarket (which expire after 2 weeks) or do you use dried yeast, sold in tiny bags (lasting forever) in the baking section (not cooled)? And either way can you tell me how much grams the amount you use weighs?
Thanks for sharing!
I use the kind sold in bags that lasts forever. I do not know the amount in grams, I am sorry. A soup spoon full would give you good results. It isn’t crucial to be exactly accurate with the yeast in this recipe. Good Luck
Hi Maria, I want to try this recipe but I have 2 questions:
1) I do not have corn flour – what else can I use?
2) What flour is best to use, white bread or normal cake flour?
Thank you
Phillie
Hi Phillie, You don’t have to have the corn flour. Just cook it on a lightly greased cookie sheet or parchment paper and it will be fine. I just use regular all-purpose flour when I make this bread. 🙂
Hi Maria;
Tried your bread today. It just came out of the oven and tastes delicious. A couple of questions. After adding the 5th cup of flour the bread still seemed a bit sticky. I didn’t add more flour though.
I shaped it as you instructed and made the cuts and set it to rise in my warmed oven with the light on for 40 minutes. When I put it in the oven to rise it looked just like your picture. When I took it out it was fairly flat and the cuts had disappeared.
I baked it anyway and it looks good (apart from being flatter and not seeing the cuts) and it tastes good.
Just wondering if I should have added more flour even though I’d already put in the 5 cups. Also, what about the flattening out?
Thanks
Hi Shirley, My bread does that sometimes too, I haven’t quite been able to figure out why it comes out flatter some days and puffier on other days. It may have to do with the humidity in the air or how much flour I add. Wish I had a concrete answer for you, but I am still trying to figure it out. I generally add a little more flour if it is still quite sticky even after five cups, but I try to never add more then 5 1/2.
Can you use rye flour or wheat flour instead of white flour??
Hi Joyce, I have used half wheat and half white with this recipe and still had success. The loaf ends up a little flater. I have never used rye flour though, so I am not sure how that would turn out.
The amount of flour, how do you measure, one cup = 8oz or what
I used a measure of one cup= 4.5oz and it wasn’t enough flour for 2 cups of water, crust was great , but inside didn’t cook all the way. I also chopped up
2 bunches of green onion and added, great flavor.
Hi Greg. When I measure flour I scoop it into a measuring cup and level it off. I don’t take the time to weigh it, so I can’t say how much my measured out cups would weigh. I’m surprised to hear the inside of your bread didn’t cook all the way. With bread recipes, depending on humidity and other factors, sometimes you will need to add a little more flour then what a recipe calls for. Making bread is more about getting familiar with the feel and texture the dough should have then following the flour measurement exactly. I hope you will give this recipe another try.
Was looking for a bread to make to use for a cheesy garlic pull apart bread recipe. Will try this bread 🙂 ty
Great! Hope it works well? Let me know!
Just baked these artisan no knead bread and I love it because it’s so easy and my hubby love it thanks for your easy to do it recipe. Looking forward for more.
Thank you, so glad to hear this!
This is my new go to bread recipe. I use the Food Nanny Kamut flour and it makes it out of this world! Thank you so much for sharing!
Awesome! I love hearing this Jacquelyn.
I tried following your receipie, but my dough doin’t rise much once in the oven. I used Fleischmann’s dry active yeast. And let it proof for almost an hour. I used 3.5 cups of bread flower, 1.5 cups of Whole wheat flower and 1/8 of a cup semolina flower. Looks good but not full and round. It’s somewhare in the middle. Any advice?
Sometimes the whole wheat flour causes it not to rise as high. You can try again with all regular, all purpose flour. Best of luck!
This looks so good
November giveaway
Thank you
This is one of my go to recipes.
November giveaway
Love hearing that Callie!
Do you use all purpose or bread flour?
Hi Becky, I actually just use regular all-purpose flour, but it would probably be even more delicious with bread flour.
Love love this recipe ! I have made it thousands of times over the last two years and it always turns out perfect and taste. Wonderful ! We use it for everything. Thank -you !
Thanks, Elissa! So glad you love it.
This is a very satisfying bread to make. It’s easy to make, and delicious! If you can serve it fresh from the oven you won’t be able to stop eating it. So good.
Thanks, Jennifer! Homemade bread is the best!