
I couldn’t find it, and I couldn’t get a hold of my mom. Instead of being patient and waiting until the next day to make them, I had to have them now, so I looked for a good recipe I knew I could trust for the cookie part and went for it.
I used the brownie part of the Brookies recipe from Mel’s Kitchen Cafe and tweaked it just a little. They turned out great!
The trickiest part of this recipe is cutting the dang marshmallows in half. Seriously, it’s a little bit of a pain. Make one of your kids do it, or your husband.
 You bake the cookies most of the way, and then for the last 2 minutes, you add half of a large marshmallow to the center of each cookie and let it bake a little longer. When they come out, leave them on the cookie sheet for a couple of minutes because the cookies are soft and will break easily. They need a little resting time before you transfer them to the cooling rack.
While they are resting on the cookie sheet, if you want, you can carefully spread the marshmallow around. You can leave it how it is, but if you want there to be marshmallow in more than just one or two bites, you need to spread it a bit. I have tried a couple of different methods for this and find the best way is to carefully grab each side of the marshmallow and pull one up and one down, sort of in an S-pattern. The marshmallow is still a little hot, so try to barely touch the edges when you do this.
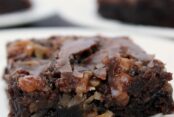
After the cookies are done and cooling nicely on the cooling rack(s), prepare the fudge frosting. I like to wait for the cookies to be almost completely cooled before adding the frosting because I don’t want it to melt off.
I add a spoonful to the center of each cookie and spread it around.
These cookies are really good, right when they are done, but they are phenomenal if you make them a day ahead and they have a chance to really set. The cookie texture becomes perfect, with the soft marshmallow topped with the fudge frosting–forget about it. There is no stopping yourself.
 Also, as you will see in the recipe directions, I mention that these cookies are very chocolaty. If you want, you can reduce the amount of cocoa by 1/3 cup and substitute regular all-purpose flour for it. The cookies will still be chocolaty; they just won’t have that rich brownie flavor.
Tips for making Marshmallow Brownie Cookies
If you use all butter, the cookies will spread and be thinner. To help prevent them from spreading, you can put the dough in the fridge for about an hour, or use coconut oil in place of butter and shortening if you’re not allergic to it.
More brownie recipes you'll love


- 1¼ cup softened butter or shortening (I like to use half butter and half shortening.)
- 1⅓ cup granulated sugar
- 1⅓ cup brown sugar, do not pack
- 3 eggs
- 2 tsp vanilla
- 3 cups all-purpose flour
- 1 cup cocoa (If you do not want these super chocolaty, use ⅔ cup cocoa and an extra ⅓ cup flour.)
- 2 tsp baking soda
- ½ tsp salt
- 24 large marshmallows
- ⅓ cup butter
- 3 tbsp cocoa powder
- 3 tbsp heavy whipping cream or evaporated milk
- 1 tsp vanilla
- 2¼ cups powdered sugar
- Preheat oven to 350 degrees and prep two cookie sheets with parchment paper. Set aside
- Using kitchen sheers or a sharp serrated knife, cut the 24 large marshmallows in half and set them aside.
- With a hand mixer or in your stand mixer, cream together the softened butter, granulated sugar and brown sugar. Mix on medium speed until butter is incorporated into sugars.
- Add the three eggs one at a time and then add the vanilla. Mix for one minute on medium speed.
- In a separate mixing bowl, combine, flour, cocoa, baking soda and salt. Mix well and then slowly add a cup at a time into the butter/sugar mixture. Mix until combined.
- Using a cookie scoop, drop cookie dough by the scoopful onto the prepared cookie sheets. Leave 2 inches between each cookie dough ball. You sould be able to get at least 12 cookies on one cookie sheet.
- Bake cookies for 8 minutes, careful open oven and place one of the marshmallow pieces (the ones you cut in half) gently on the top of each cookie, being careful to get it in the center.
- Bake for an additional 2 minutes.
- Remove from oven and allow to cool on the cookie sheet for 2 minutes. While cookies are cooling, you can spread the marshmallow if you want to, or you can leave it the way it is. I like to lightly grab each side of it and pull it open, and then take one side up and one side down, sort of making an "S" shape. I do this so that more of the cookie will have marshmallow on it when you take a bite.
- After the two minutes on the cookie sheet, transfer the cookies to a cooling rack. The cookies will be a little fragile until they are completely cooled, so be careful not to break them.
- Repeat each of these steps until you have cooked all of the cookies and they are all out of the oven and cooling.
- While cookies continue to cool, prepare the frosting by putting the butter, the cocoa and the heavy whipping cream or evaporated milk into a small saucepan. Turn it on to medium-high heat and use a whisk to stir it and get out any clumps of cocoa. When mixture comes to a boil, remove it from heat and add vanilla and 2¼ cups of powdered sugar. Whisk those ingredients in until frosting is smooth. Using a regular spoon, put a spoon of frosting on each cookie and spread it around as evenly as possible. Let cookies cool completely.
- Store cookies in an airtight container.


These spread ridiculously and melted through in the centers. I think the butter to dry goods ratio is off.
Hi, Matt. Sorry you had trouble making these cookies. If you use all butter, the cookies will spread and be thinner. To help prevent them from spreading, you can put the dough in the fridge for about an hour, or use coconut oil in place of butter and shortening if you’re not allergic to it.